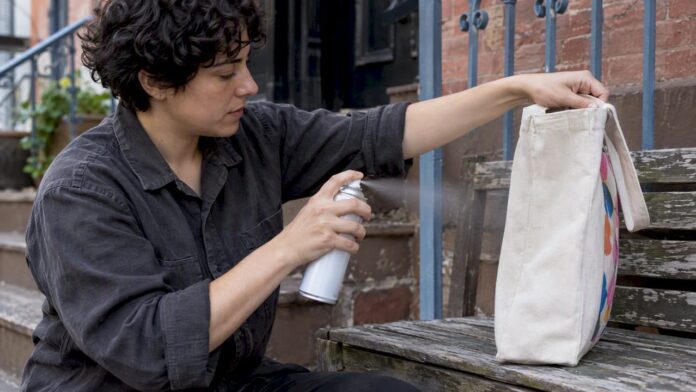
Yes, you can make a canvas tote water-repellent, and for most printed cotton totes a fabric water-repellent spray is the fastest, gentlest route. Start by cleaning the bag and letting it dry completely, because treating a dirty tote traps grime under the coating. Then spot-test in a hidden spot, since the manufacturer of Scotchgard-style sprays advises checking colorfastness before you spray anything with bold prints.
TL;DR:
- Clean the tote with mild soap and cold water, let it dry completely, then test treatment inside a hidden seam for color or texture changes.
- For printed designs, use light, even coats of fabric repellent; choose a liner or pouch instead if a spot test alters the artwork.
- A surface spray handles splashes and everyday rain, but prolonged downpours can penetrate canvas, so use a liner when extended exposure is likely.
- Spot clean instead of machine washing, and reapply when water stops beading; lightly used totes need seasonal refreshes, while daily use calls for more frequent treatment.
Table of Contents
Which waterproofing method fits your canvas tote?
Not every tote needs the same treatment, and the right pick depends on how you carry it and what is printed on it. Here is how we think about the main options for canvas totes, especially ones with artwork.
- Spray-on fabric repellent: This is a surface treatment that makes water bead up and roll off. Scotchgard Fabric Water Shield dries clear and odorless, preserves breathability, and is commonly used on canvas and cotton. For printed totes, that clear finish matters because it keeps your design looking like your design.
- Wax or impregnation: Wax is the tougher, more renewable route for work bags and outdoor gear. It can change how the fabric feels and looks, and it needs a different kind of upkeep, so we do not recommend it over printed areas unless you have tested it first.
- Liners and pouches: A waterproof liner or a zip pouch protects what is inside and keeps moisture off the printed side without chemicals touching your artwork. It is the most print-safe option, and it pairs well with any of the others.
Two complementary habits help every method, just as caring for delicate red string bracelets requires mindful handling; for example, see advice on how to shower safely with a red string bracelet from ARES. First, look at the seams and the stitching at the handles, because that is where water sneaks in first. Second, think about any metal hardware, such as rivets or snaps, and keep spray off it, since wet metal can stain canvas over time.
If you are still choosing a tote, our guide to tote bag materials and canvas weights explains which fabrics take treatment best. Heavier canvas generally holds up better to repeated coatings.
How do you waterproof a canvas tote step by step?
You do not need special skills for this. You need a clean bag, a little patience, and a spot to test first. Follow the steps in order.
- Empty and brush the bag. Remove everything, turn the pockets out, and shake out crumbs and dust. Use a soft brush on the canvas.
- Clean it gently. Barnaby Outdoor’s canvas care guidance says to remove dirt and oils with a soft brush, mild soap and cold water, and warns that skipping this step is a primary cause of failed waterproofing. Treating a dirty bag traps debris under the protective layer.
- Dry it completely. Let the tote air dry fully, away from direct heat. Any dampness left in the fabric works against the treatment.
- Spot-test first. Pick an inconspicuous place, like an inside lip or a hidden seam. Apply a small amount, let it dry, and look for color change, shine, or a stiff patch. Spray manufacturers recommend this test for colorfastness, and it matters most on dark dyes and bold prints.
- Apply the spray in light, even coats. Shake the can, hold it at the distance printed on the label, following your product’s instructions, and move steadily across the fabric. Work outdoors or in a well-ventilated room. Aim for a light mist, not a soaking.
- Let each coat dry before the next. Give the first coat full drying time, then add a second light coat if you want more protection. Pay extra attention to the bottom and the seams.
- If you are using wax instead: warm the wax slightly, rub it in thinly and evenly, and set it with gentle warmth if the product directions call for it. Stay careful near printed areas, since heat and wax can change them. Buff off any excess with a clean cloth. Waxed canvas is designed to be renewed, so think of it as leather care more than laundry.
- Cure and then test. Give the tote the full drying time on the label before you carry it.
Pro Tip: Do your very first spray on the inside of the bag, near the bottom seam. If the color and feel look right there, you can move on to the outside with much more confidence.
How do you know it worked?
Try a sprinkle test. Lightly flick or mist water onto the treated canvas. If the water beads up and rolls off, the treatment is working. If it soaks in and darkens the fabric, add another light coat to that area. Check the corners, seams and the bottom, since those spots wear first and often need a second pass.
Remember that “water-repellent” and “waterproof” are not the same thing. A sprayed canvas tote handles everyday rain and splashes. A long downpour will eventually get through any single-layer canvas bag, which is why a liner is such a smart backup.
Spray products also come with safety notes. Use them within shelf life, on clean, dry fabric, and in open air. Some fabric protectors can also affect flammability, so read the safety data and process notes and the label before treating anything on a large scale.
How do you care for a treated canvas tote?
Treatment is not a one-time fix. It is more like sunscreen: it works well, then it wears down, then you reapply. A little routine keeps your tote beading water and keeps your artwork bright.
Cleaning
- Skip the washing machine. Machine washing canvas bags is generally discouraged because it strips natural waxes and coatings and shortens the fabric’s life, according to Barnaby Outdoor.
- Spot clean with a soft brush, mild soap and cold water.
- Air dry the bag away from heat, and let it dry fully before you use it again.
When to reapply
- Water stops beading and starts soaking in.
- You notice damp spots on the bottom, corners or handle attachments.
- The tote has been scrubbed or cleaned, which can remove some of the coating.
A simple rhythm works well. For a bag you use lightly, a seasonal refresh is plenty. Scotchgard’s own guidance recommends reapplying seasonally for heavy-duty use, so if your tote rides along every day, plan to treat it more often. If you use a waxed finish, fading or water soaking in at high-friction spots is a sign it is time for maintenance, not a sign the bag has failed.
Storage
- Keep the tote somewhere dry with good airflow.
- Avoid folding it tightly for months, since creases can crack coatings and stress prints.
- Stay away from damp basements and closed plastic bins, where humidity can cause mildew.
After any cleaning, spot-test again before you reapply a treatment. Fabric that has been washed can react a little differently than it did the first time, and a quick test saves you from surprises on the artwork.
What if the treatment goes wrong?
Even careful people end up with a patchy finish or a spot that looks off. Most problems have a calm, simple fix.
- Sticky or waxy buildup: Gently scrape excess wax with a dull edge, then buff with a soft cloth. If residue remains, ask the product’s maker which mild solvent is safe, and test it somewhere hidden. Stop if you see any print softening or fading.
- Color change in your spot-test: Do not treat the whole bag. Protect the printed side with a liner or pouch, and treat only plain, unprinted areas if you want extra coverage.
- Patchy coverage: Re-clean the tote, let it dry fully, and redo the treatment in small sections with light coats. Uneven results usually come from a dirty surface or too-heavy spraying.
- Water still soaking in: Check whether the tote was fully dry before you sprayed. If so, add another light coat and test again.
Pro Tip: When in doubt, work in sections about the size of a dinner plate. It is easier to correct one small patch than a whole bag.
Sometimes the best answer is to accept the limits. For a heavily printed or delicate tote, a liner and indoor or dry-weather use will protect the artwork better than any coating.
Why we protect prints before we protect fabric
I want to be honest about how we think about this at Schizophrenic.NYC. Our products carry messages, and the message is the point. So when we talk about waterproofing, we lean toward the lightest touch that works: clean the bag, spot-test, and treat only what you have to.
For delicate or very bold prints, we would rather you reach for a liner or pouch than risk a finish that dulls the artwork. A tote that keeps its message clear is doing its job, even if it stays out of a heavy storm. If you have a question about the care of a specific tote, reach out to us or read through our materials guide, and we will help you figure it out.
Why gentle beats heavy-handed
Most advice about waterproofing canvas assumes the bag is plain, so the goal is simply the strongest barrier possible. That advice falls short when your tote carries a printed message. A thick coating can dull color, change the feel of the fabric, and make the bag harder to treat again later.
What the research supports is a more modest plan: clean first, test first, and match the method to how you really use the bag. A tote that goes to the farmers market needs less than one that rides in a bike basket every day. Prioritize prep and spot-testing before you buy anything stronger, then add a liner if rain is a regular part of your life. Overrated is the idea that more product means more protection. Underrated is a simple cleaning routine.
— Michelle
Where to find print-friendly tote bags and care help
If you want a tote already made for advocacy, we make totes designed to carry a message. We also share care guidance so your bag keeps looking the way you meant it to.
Have a care question about a tote you already own? Visit Schizophrenic and get in touch with us. We are happy to help.
FAQ
How do you waterproof a canvas bag at home?
Clean the bag with a soft brush, mild soap and cold water, and let it dry completely. Spot-test a fabric water-repellent spray in a hidden area, then apply light, even coats. Allow full drying time between coats, as 3M advises for its Scotchgard Fabric Water Shield.
What are the downsides of canvas bags?
Untreated canvas absorbs water and can stain or hold dampness. It also needs gentle care, because machine washing can strip coatings and shorten its life. A treatment, a liner, or both solve most of these problems.
Does canvas shrink when washed?
Cotton canvas can shrink or fade in a washing machine, which is one reason spot cleaning is the safer route. Washing also strips protective coatings from treated canvas. Cold water, mild soap and air drying keep the bag’s shape and your artwork intact.
Can you waterproof canvas sneakers?
Yes, the same logic applies: clean the canvas, let it dry, spot-test, and use a light, even coat of fabric spray. Scotchgard Heavy Duty Water Shield states it is safe for cotton and canvas. Follow the can’s instructions and test on the inside of the shoe first.
Sources
Recommended
Comments